How to Draw a Butterfly
Any butterfly drawing or painting will be a success
Butterflies are beautiful creatures that play an important role in nature. They are known for their colorful wings and unique patterns. In this tutorial I will show you how to paint butterflies in two parts: The first part of the tutorial is for kids and anyone who wants to draw a very simple butterfly. The second part of the tutorial is for all those who want to draw a detailed and realistic butterfly.
No matter which part you choose, grab your materials for painting and/or drawing and let’s get started.
Drawing a Simple Butterfly (also for Kids)
If you’re looking for instructions on how to draw a simple butterfly, this section is for you. It’s also great for painting with kids!
I would recommend not putting so much emphasis on the sketch, but to focus on and enjoy playing with the colors for the wings.
To draw the body of a butterfly, draw one circle for the head and two long or very narrow ovals.
For the wings, you need four round shapes. The two upper ones should be larger than the lower ones.

In the next step, you can add patterns to the wings. This step is optional and you don’t have to draw a pattern if you prefer to draw plain wings.
The patterns can be as simple or as complex as you like. Just keep in mind to mirror the pattern on the opposite wing.
I opt for a few circles and border marks for my drawing.

The last step is to color the wings. Here you can use as many or as few colors as you like. For my drawing, I use two colors and a pencil for the wings.
Also, don’t forget to color the body of your butterfly.

How to Draw a Realistic Butterfly
In this section we will draw a realistic butterfly step by step. For my artwork I use colored pencils, but you are also welcome to use other materials such as watercolors or alcohol markers. Butterflies also look great when drawn exclusively with pencils.
The Anatomy of a Butterfly
To draw a realistic butterfly we don’t have to be a biologist, but it is quite helpful to study the anatomy of a butterfly in advance.
The body of a butterfly is divided into three parts: Head, Thorax and Abdomen.
The head is small and round, with two large eyes made up of many small lenses to allow a wide view of the surroundings. The antennae are long and thin, and are thickened at the end. The mouthparts are joined to form a long, curled tube that the butterfly uses to suck nectar from flowers.
The thorax is both wider and flatter compared to the head, and contains three pairs of legs and two pairs of wings (the forewings and hindwings). The legs are thin and segmented, with small claws to cling to surfaces. The wings are thin and translucent and have fine veins that give them structure.
The abdomen is long and narrow and contains the butterfly’s organs, such as the reproductive organs or the digestive system.
This anatomical structure is generally valid for all butterflies. Nevertheless, when drawing a butterfly, it is advisable to consult a good reference on which you can accurately see all the details, such as patterns, but also the proportions.

L. Shyamal, CC BY 2.5, via Wikimedia Commons
Drawing a Sketch of the Butterfly
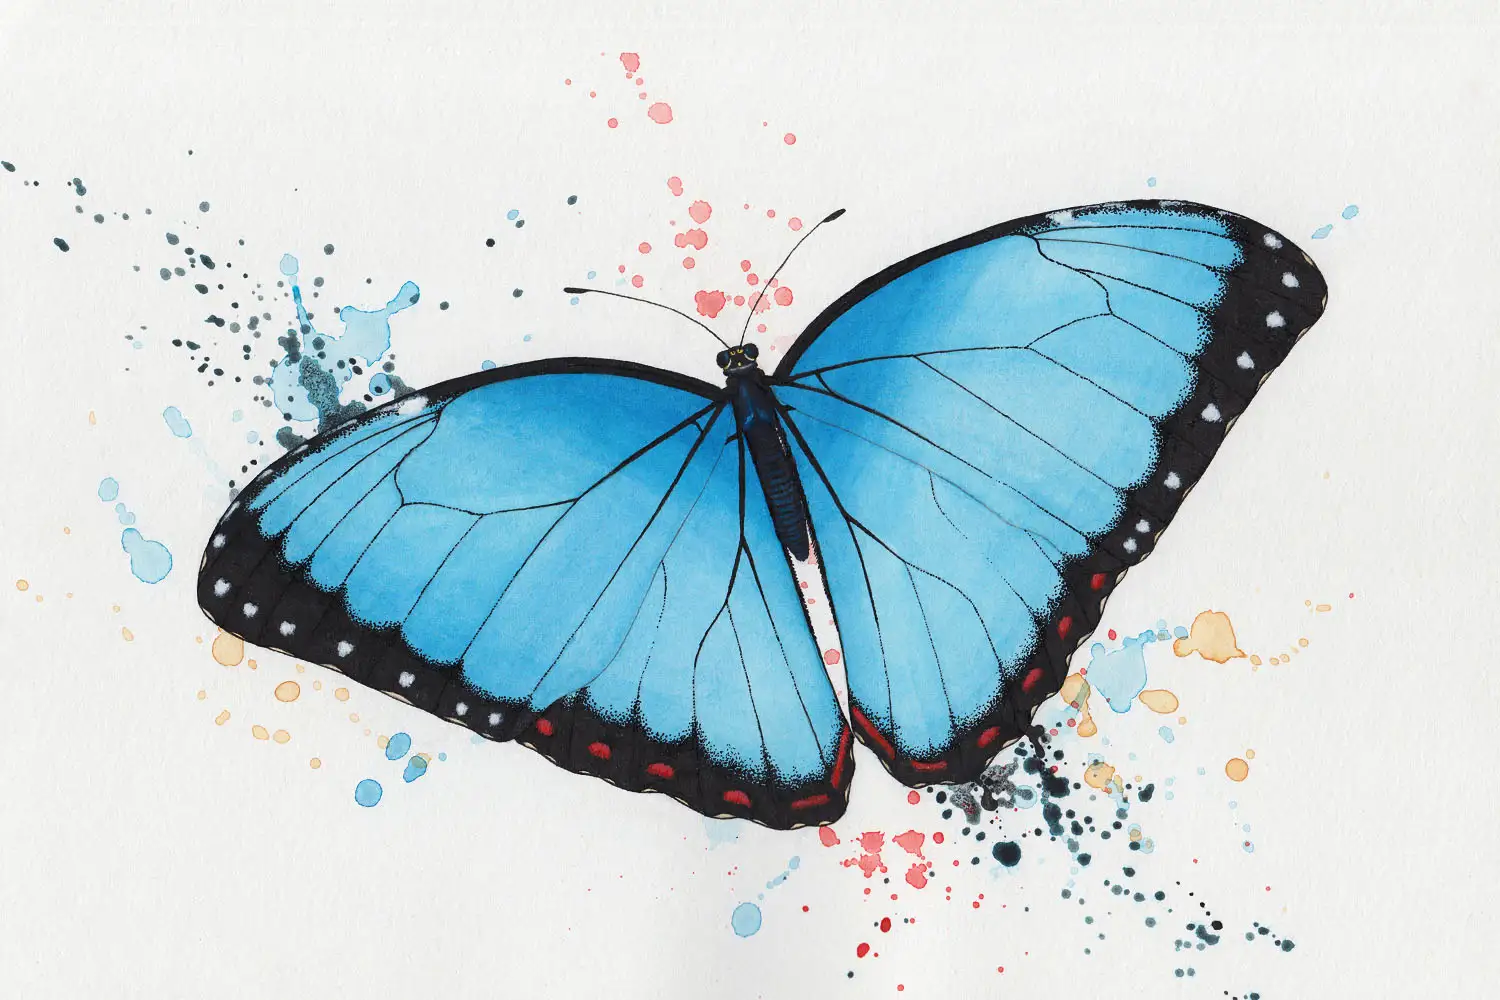
Let’s start with a detailed sketch, for which we first need a good template. The best thing for this is a high-quality photo, where we can see all the details such as veins, hairs, patterns, etc. in detail. I use several photos of a Morpho peleides butterfly for my painting as a reference.
When sketching, we should pay special attention to the symmetry of the wings. The older a butterfly is, the more likely there will be cracks and other blemishes on the wings, but the general shape of the two pairs of wings should be the same. We should record the patterning in as much detail and cleanliness as possible, as this will make the next steps much easier and we will be able to better orient ourselves.
We should also not neglect the body, because even if it seems rather inconspicuous next to the large wings, small details such as patterning, shapes or hair can be found here.

For my sketch, I use a very hard F pencil at the beginning. However, in the end, I grab an HB pencil and draw even clearer, crisper lines with it.
Since I want to work with watercolors, a precise sketch is even more important. However, depending on what material you are working with, such a detailed sketch may not be necessary.

Painting Butterfly Wings
Now comes the best part: we add color to the wings of our butterfly.
I would recommend testing the colors you want to use on a separate piece of paper beforehand. That way we can better see if they go well together and save ourselves potential trouble if we realize only while drawing that we don’t like the color combination.
For my painting, I want to depict a Morpho peleides butterfly and primarily use the color Cerulean blue hue from Schmincke Horadam Watercolor. I also decide to start the painting with a few watercolor splotches, but if you want to keep your painting as realistic as possible, you can of course do without this step.
Since I only want the splotches around the butterfly, I immediately dissolve splotches on the wings with a brush and clear water and distribute the color evenly on the wings. Since the wings will be blue anyway, it doesn’t matter at all that there is already a transparent layer of paint here.

In the next step, I apply the Cerulean blue hue to all the wings. To apply the color as evenly as possible and to be able to paint the color gradient at the base of the wings, I work in several layers here.
I let one layer dry completely before applying another. This prevents me from using the brush to loosen the pigments from the previous layer, which can lead to a blotchy result.

Some of the patterns on the wings are quite small, such as the fine strokes on the outer edge.
I use the color Yellow Ochre for these strokes and don’t miss out on the opportunity for more watercolor splotches.

On the hind wings, in addition to the yellow strokes, there are red dots and stripes in places. I don’t paint these too cleanly, because, in the next step, I will use black ink to form these patterns afterward.
But if the patterns of your butterfly require more precision, feel free to take as much time as you need to work on it.

I apply the ink with a nib to be able to draw especially precise strokes and dots. In many photos of the Morpho peleides butterfly, the transition from black to the other colors looks pixel-like, which is why dotting is the optimal hatching technique for my painting.
As mentioned before, I use the ink application to shape the white and red patterns by not drawing the edges harshly but using dotting here as well.
Depending on what material you’re working with, and especially what butterfly you’ve chosen to draw, dotting may also be a good choice, or you may be better off with a completely different technique.

In the last step, I add opaque white. I use this mixed with a little water to enhance the white patterning on the wings.
For example, there is a white spot on the top edge, and I use opaque white to soften the edges. I also draw stripes along the edge starting from this white spot, using opaque white.
For the red spots on the hind wings, I put the opaque white aside for the moment and paint over the edges with the same shade of red (vermilion), which softens them. Once the areas are dry, I mix the vermilion with a very tiny bit of opaque white and apply it very subtly to the red dots.

Painting the Butterfly’s Body
It’s up to you how detailed you want to work on the body of your butterfly.
If the wings are more important to you, then you can paint the butterfly body in one color and just make sure that the outlines are drawn realistic.
If you decide to work on the the butterfly’s body detailed, then examine the body closely on your reference. The Morpho peleides appears to have an all-black body at first glance, but on closer inspection, it shimmers slightly blue.
Since I first drew the butterfly body of my drawing with black ink, I have to add a little opaque white to the Cerulean blue hue to make the color stand out from the ink. I don’t apply this mixture to the entire body, but only to very specific areas to bring out the individual segments.

Butterfly Drawing
Painting or drawing butterflies is really not difficult if we keep in mind some points and give ourselves enough time. I hope this tutorial was helpful for you and you enjoyed it. Feel free to share your thoughts or even your butterfly artwork below in the comments!